How To Build A Huge Etsy POD Shop Fast Using AI + Automation
Overview: This guide is for sellers who want monster-sized, rapid growth—not slow, incremental gains. We’ll show you how to stack AI + automation so you can publish massive volumes of Etsy-ready POD products with minimal time and effort. You’ll design standardized systems for maximum throughput, generate a gigantic bank of artwork images quickly, and then bulk-convert those images into fully configured, SEO-optimized listings using the Bulk POD Product Creator. The result: a repeatable growth flywheel that takes you from dozens of listings to hundreds—or thousands—fast.
Forget “Steady Growth.” We’re Talking Monster-Sized Expansion.
If you’re looking for a gentle blog post with a few generic tips about Etsy, this isn’t it. This is about scaling your shop into a massive, high-output machine—fast. The kind of growth where your store doesn’t just creep from 50 products to 60, but erupts into hundreds (or even thousands) of listings in a fraction of the time it normally takes.
Why does this matter? Because on Etsy, catalog size equals opportunity. Every listing is another doorway into your shop, another chance to capture long-tail keywords, another chance for a buyer to stumble into your store and not leave empty-handed. But the truth is: manual creation will never get you there. Clicking through menus, uploading one image at a time, and hand-typing product info isn’t a growth strategy—it’s a bottleneck.
This post is written for sellers who want to blow past that bottleneck and embrace a next-level mindset: stacking AI + automation workflows so that building a massive Etsy shop becomes systematic, efficient, and shockingly fast. We’re going to cut through the busywork and show you how to design a monster-sized POD shop with the least amount of time, effort, and energy possible.
If your goal is to publish more, sell more, and dominate faster—you’re in the right place.
To Grow Your Etsy POD Shop Fast, Design Your Systems for Maximum Speed, Efficiency, and Scale
Here’s the first truth you need to internalize: big shops don’t happen by accident. They’re the product of standardized systems, lean processes, and ruthless focus on throughput. If you want a huge catalog, you have to stop thinking like a hobbyist and start thinking like a factory.
That means making tradeoffs and eliminating waste from your workflow:
- Pick standard product variants and stick to them. If you always use the same poster sizes or apparel fits, you remove the decision fatigue and setup time that slows you down.
- Create artwork in standardized aspect ratios. Don’t generate a messy mix of 2:3, 4:5, and panoramas if it’s going to force you to redo placements for every variant later. Lock in a ratio and build everything around it.
- Stop reinventing the wheel for every listing. Doing each product “your own way” every time feels creative, but it destroys your throughput. At scale, creativity lives in the art itself—not in the repetitive mechanics of listing creation.
Look at any business that’s scaled quickly and successfully: they standardize. They systematize. They design their processes to be repeatable, efficient, and scalable. Waste gets stripped out, bottlenecks get crushed, and energy is conserved for what actually moves the needle.
This is the mental shift that separates shops stuck at a few dozen listings from shops that break into the hundreds. If you want speed and scale, your workflow has to be built like a machine. Once you’ve locked that mindset in, the rest of this post will show you exactly how to apply AI + automation to make it real.
Core Workflow Step 1: How To Create a Gigantic Volume of POD-Ready Artwork Images Fast Using AI
If you want a monster-sized Etsy shop, the very first bottleneck you must eliminate is artwork creation. Without a large bank of images, you’ll never have the fuel to build hundreds (or thousands) of products. Luckily, this is exactly where AI shines. With the right workflow, you can generate a huge volume of print-ready images in a fraction of the time it would take manually.

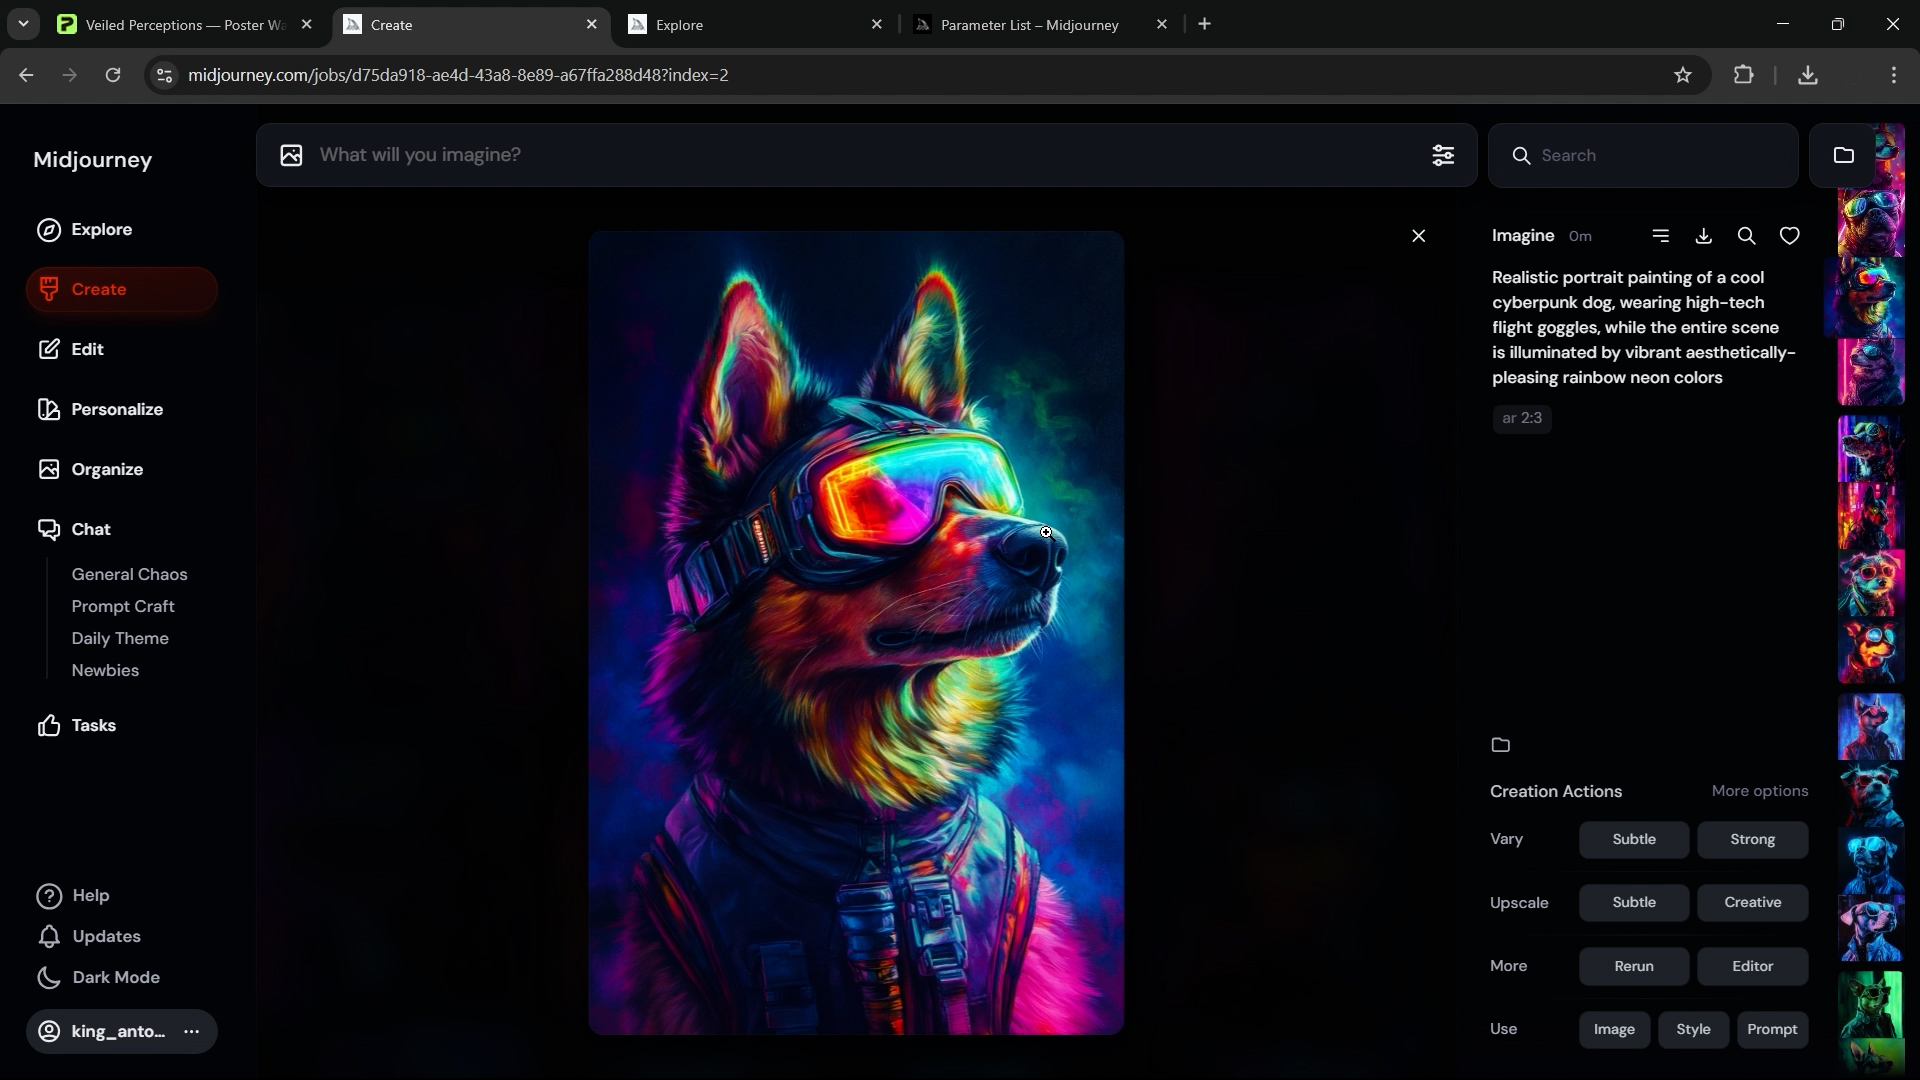
Method 1: The Simple, Fast Midjourney Workflow
This is the most accessible way to build a large art library quickly. You’ll bulk-generate text prompts using ChatGPT, feed them into Midjourney, and download the best resulting images.
Option 1: Do It Yourself
You don’t need a team or technical setup here—just a smart workflow:
- Start with a few strong example prompts. Test styles that Midjourney consistently produces well. Stay away from anything it struggles with (large blocks of text, precise items like currency, hyper-specific details).
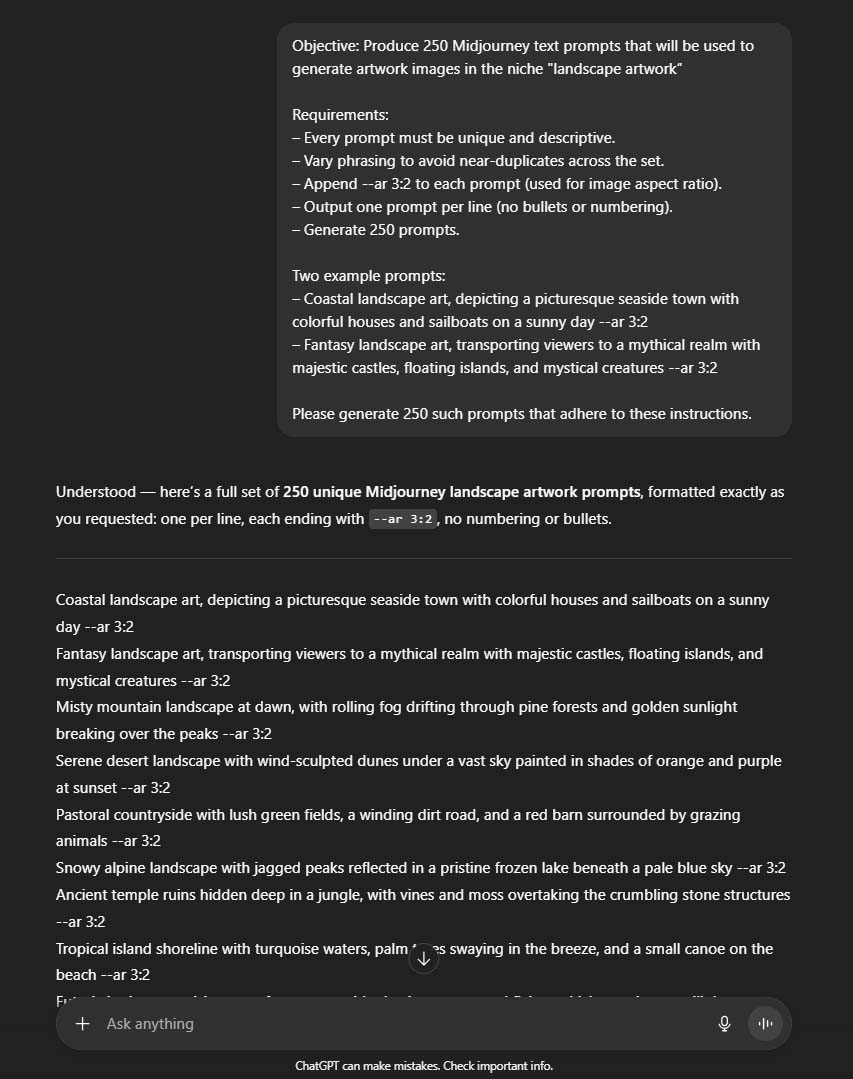
- Use ChatGPT to expand your prompt set. Once you’ve identified a style with a good “hit rate” (ideally 30%+ of outputs are usable), ask ChatGPT to generate dozens or hundreds of variations on those prompts. This keeps outputs varied yet consistent with your shop’s theme.
- Organize your prompts in a spreadsheet. One prompt per line. Keep the spreadsheet on the left side of your screen, Midjourney on the right.
- Rapid-fire prompt entry. Copy/paste each prompt into Midjourney, let multiple generations run simultaneously (the exact number depends on your plan/tier).
- Upscale and download the winners in real time. Don’t overthink this step—just focus on keeping throughput high.

This simple structure lets you go from a handful of ideas to hundreds of POD-ready images in a single afternoon. The key is efficiency: test styles before scaling, only pursue what Midjourney produces effectively, and stay disciplined about throughput.
Pro tip: If Style A produces strong images one-third of the time, but Style B only gives you a good result once every twenty tries, scaling Style A will save you hours and multiply your productivity.
Option 2: Hire Out the Prompt Execution
If you’d rather stay focused on strategy and curation—and not spend hours inside of the Midjourney interface copying and pasting prompts, then waiting for the images to generate—you can outsource the grunt work. Here’s how:
- Prepare a list of prompts (e.g., 250 carefully written text prompts).
- Hire a freelancer (via websites like Upwork or Fiverr) to paste them into Midjourney, upscale the images, and send you the finished results in bulk (say, 1,000 images in a zipped folder).
- Maximize ROI by paying a flat-fee for a clear deliverable (e.g., 1000 upscaled Midjourney images zipped to a folder). Many overseas freelancers will charge a surprisingly low dollar-amount for such a deliverable, providing our team with quotes of $20 USD for 1000 upscaled Midjourney images.
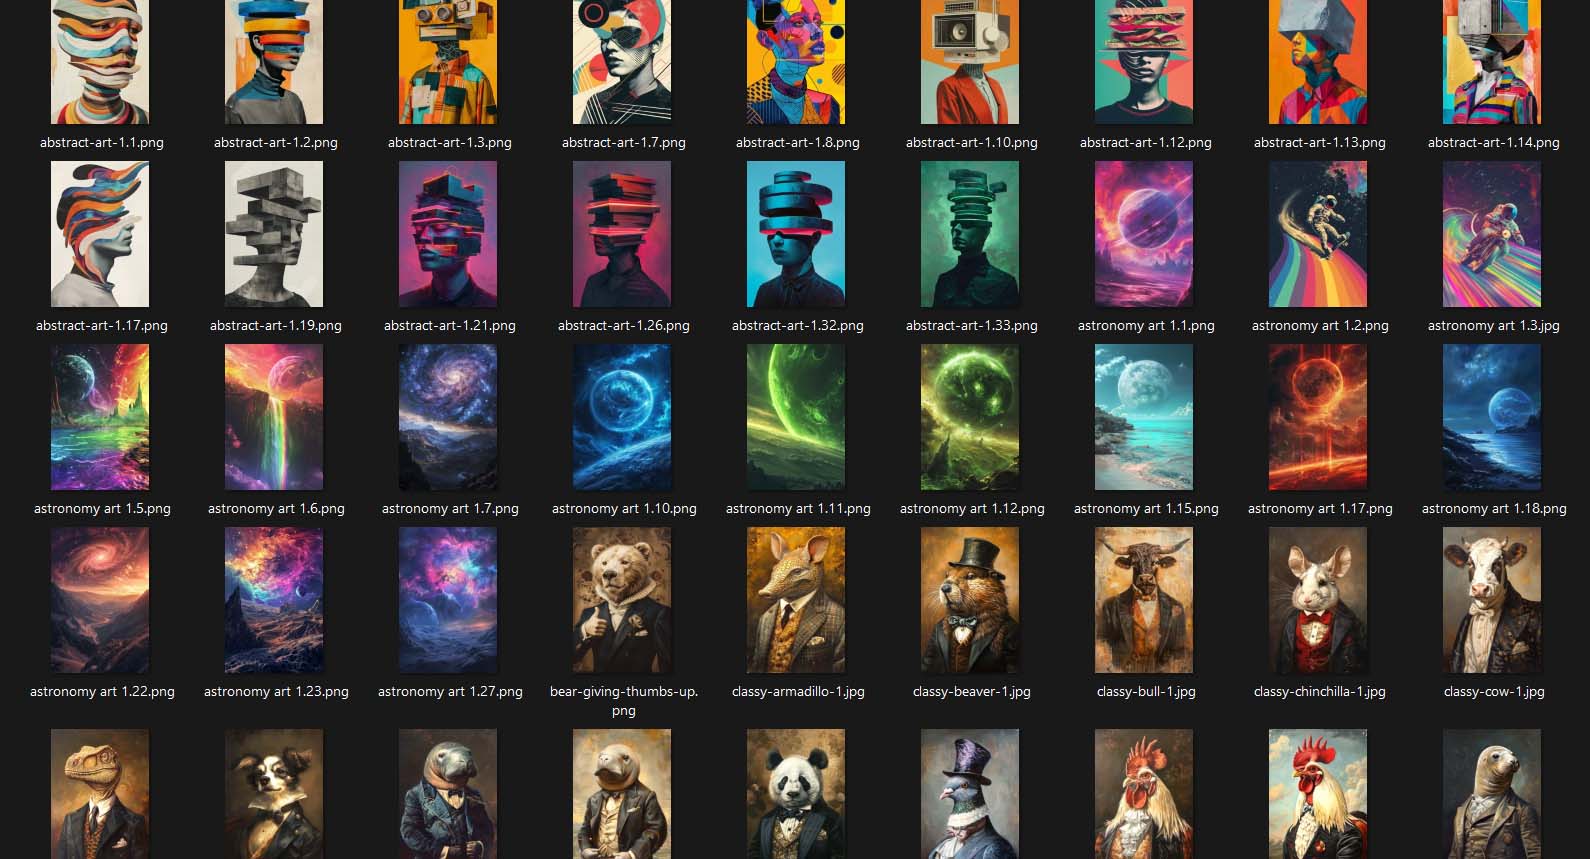
- Curate in one hyper-efficient pass. Open the folder in thumbnail view, maximize preview size, hold Control, and click only the best images. Copy/paste your selections into a new folder. Congratulations—you’ve curated 1,000 images in minutes, not hours.
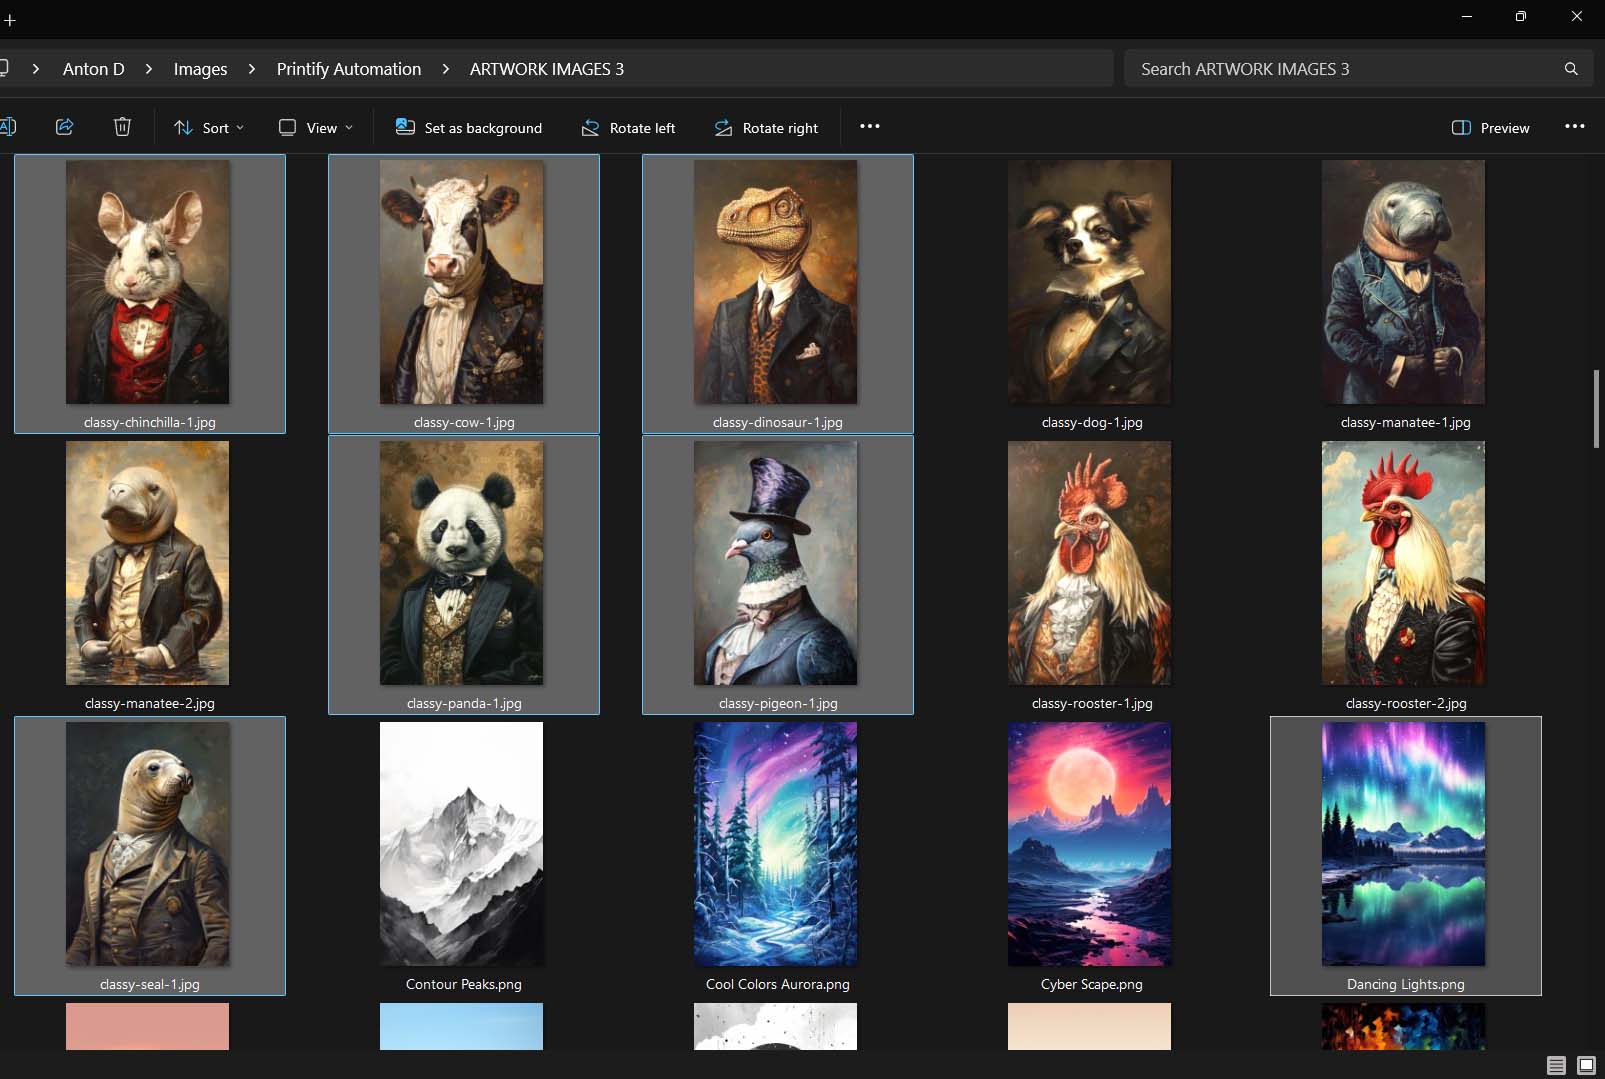
This way, you only touch the highest-value part of the workflow: curation.
⚠️ Important notes:
- At the time of writing (9/27/25), Midjourney's Terms of Service does not allow automated means of creating images through their website. (You can run several image generations concurrently, however the number of concurrent image generations allowed varies by plan level. With that said, Midjourney does generate 4 images per text prompt, and if you can run several such generations concurrently, it can perhaps be though of as a "somewhat-bulk" image generator.) Midjourney also offers no official API (which is the conventional way that such tasks are automated via software by connecting with other websites). Any site, SaaS, or extension claiming to “bulk-generate Midjourney images” almost certainly violates their Terms of Service and could put your account at risk.
- If you hire freelancers for this work, consider consulting with an attorney before engaging for tasks involving intellectual property.
Method 2: The Fully Automated Path with OpenAI
If you’re comfortable with code, you can bypass manual prompt entry entirely and set up a fully automated pipeline using OpenAI’s DALL·E 3 or gpt-image-1 models.
With Python scripts calling the OpenAI API, you can:
- Feed in a batch of hundreds of prompts.
- Automatically generate corresponding images.
- Save them directly to your computer without lifting a finger.
This method requires more technical setup but offers true automation at scale. Once configured, the system runs on autopilot, and you’re left with an enormous bank of curated, POD-ready artwork. While it may sound complicated if you've never written and ran any computer programs, it's actually not super complicated. The core workflow steps are:
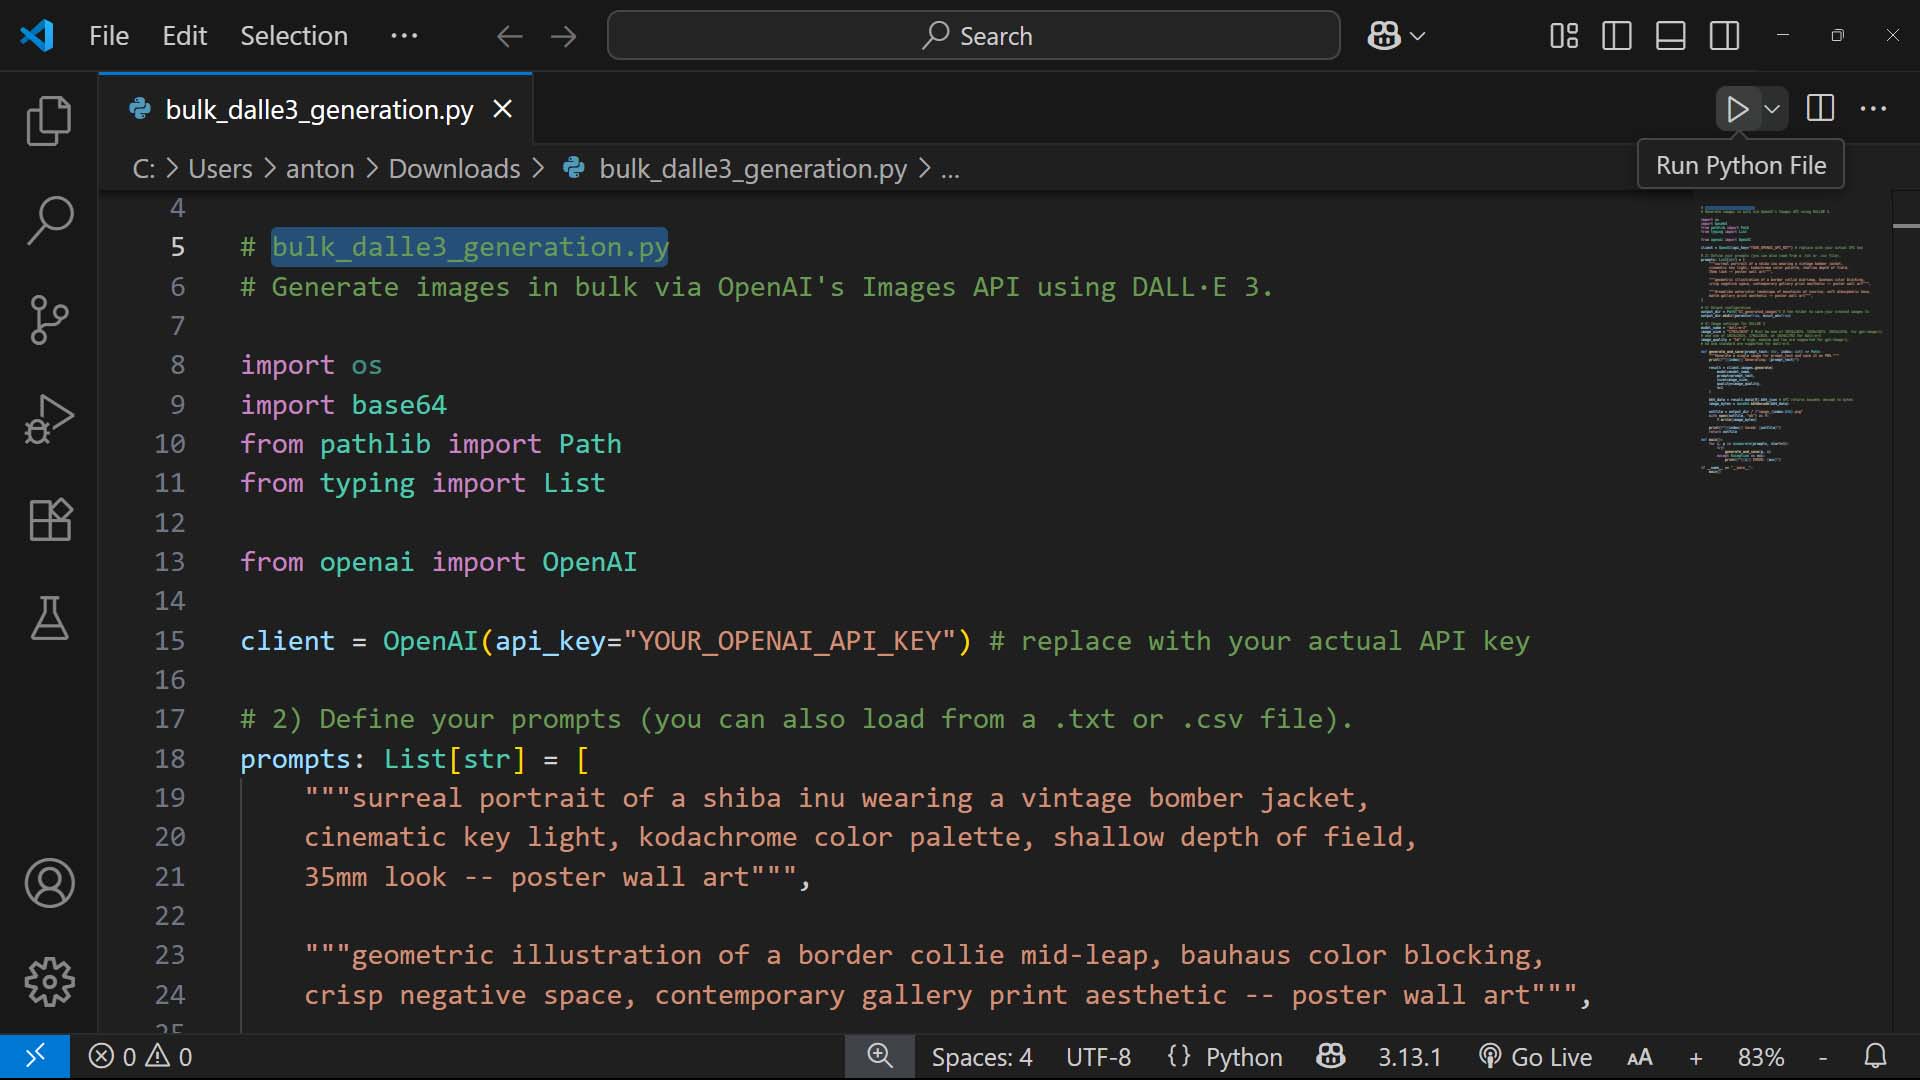
- Have ChatGPT write you a Python script that opens an Excel file (loaded with your text prompts, 1 per row), iterates over all text prompts, and—for each text prompt—it sends a request via the OpenAI API to generate the corresponding image, which you then save to your computer. (This is the most technically complicated part, however if you just continue to ask for guidance from ChatGPT at every step where you're confused, you can likely get it figured out.)
- Update the core parts of the Python script for your specific workflow (for example, update the location of your Excel file that contains the prompt names, update the folderpath location that you want to save the generated images to, update the OpenAI API key with your actual one associated with your account, etc.)
- Create an OpenAI API account via their website.
- Have some means of running the Python script itself on your computer (the simplest method is to A) install Visual Studio Code, a code-writing/-running program developed by Microsoft, then B) simply open the file containing your Python script, and click the "Play" button to run it.
For a more detailed guide on how to execute on these steps, you can consult the following resource where we covered this is more detail: https://bulk-pod-product-creator.com/blog/how-to-automate-the-creation-of-AI-images-for-print-on-demand/#openai-generation
The trade-off is complexity. If you don’t want to mess with Python, stick with Method 1. But if you do have the skills—or can hire them—Method 2 is the fastest, most hands-off way to generate art in bulk.
Dollar-Cost/Time-Cost Comparison of Bulk AI Image Generation: Midjourney vs. OpenAI? Manual vs. Automated? DIY vs. Delegated?
Here’s where the math gets interesting.
OpenAI API: Fully Automated, BUT!—Higher Dollar-Cost
OpenAI’s DALL·E 3 or gpt-image-1 API gives you a fully automated path. You can load a spreadsheet of prompts, hit “go,” and walk away. The system churns out 1,000 images in the background and saves them neatly to your hard drive. No clicking. No waiting. No copy/paste marathon.
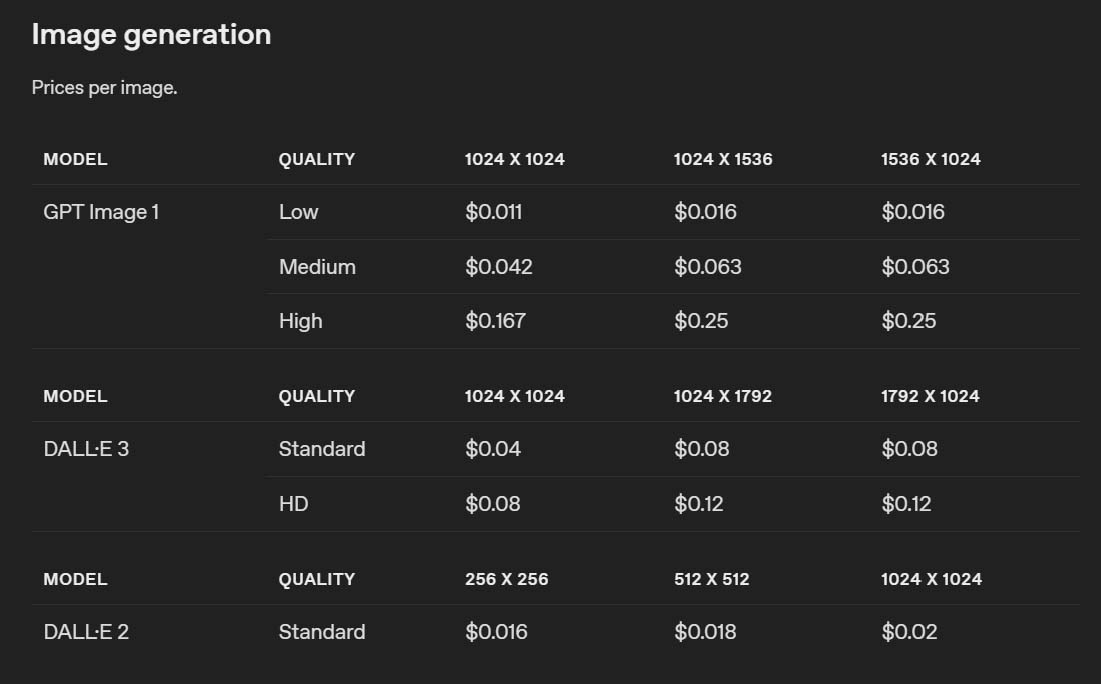
But the trade-off is cost. At current rates (roughly $0.12 per HD image at 1792x1024 resolution), generating 1,000 images costs about $120. Compare that with Midjourney’s Standard Plan at $30/month, which gives you essentially unlimited image generations. Dollar for dollar, OpenAI is more expensive.
So why would anyone pay more? The answer is time-cost. Running 1,000 prompts through Midjourney manually (or even semi-manually with multiple generations running) will eat 6–12 hours of your life. The API route lets you skip that slog entirely and reinvest those hours into higher-value work—marketing, product launches, or building the next phase of your store.
The Cheapest & Most Time-Effective Method = Midjourney Image Generations, Delegated To A Freelancer
But here’s the real curveball: delegating the Midjourney grind to a freelancer. This is where the math tilts heavily in your favor.
- You supply 250 prompts.
- A freelancer on Upwork pastes them into Midjourney, generates 1,000 images, upscales, downloads, and zips them into a folder.
- Total cost? Around $20, paid as a flat-fee for that specific deliverable.
That’s a fraction of OpenAI’s cost, and you’re still getting Midjourney’s unmatched quality—widely regarded as the best AI art generator in the market today. And you’ve offloaded the time sink. What would’ve taken you half a day (or longer) is now zero hours of your own effort.
Bottom Line: Compare Dollars vs. Hours
Put simply:
- DIY Midjourney = cheapest in raw dollars, but costs you tons of time.
- OpenAI API = pricier, but saves you hours through full automation.
- Midjourney, delegated = cheapest overall and saves your time, while still delivering the best-quality images.
If you’re serious about building a massive catalog, the freelancer option is the sweet spot: lowest dollar-cost, zero time-cost, and highest quality output.
Core Workflow Step 2: How To Bulk-Convert Hundreds of Artwork Images Into Etsy-Ready POD Products Using Automation + AI
Once you’ve generated a mountain of artwork images, the next bottleneck is getting those images converted into real, SEO-optimized, Etsy-ready products. Doing this manually—uploading one by one, setting placements, typing out descriptions—would take forever. This is exactly why the Bulk POD Product Creator exists: to automate the entire product creation process at scale.
Here’s how it works:
Step 1: Upload Images + Choose Placement Rule
You start by uploading your batch of curated artwork images. Then you tell the system how those images should be placed on the print area(s):
- Stretch Images To Fit Print Area(s) – fills every variant edge-to-edge, fast and uniform.
- Preserve Image Aspect Ratio & Center – no distortion, perfectly centered.
- Exactly Match Example Image(s) – pixel-accurate replication of a chosen Example Product.
With a single selection, this rule applies across all variants automatically. No dragging. No re-nudging. No wasting time.

Step 2: Select Your Example Product
The Example Product is your blueprint. Whatever structure you define here—variants, pricing, policies—gets cloned across every new listing.
- Variants (sizes, orientations, materials)
- Per-variant pricing and margins
- Default settings and policies
- Placement rules (if using the “Exactly Match Example Image(s)” mode)
This ensures total consistency across your catalog. You’ll never misprice a variant or forget a size. Plus, you can maintain different Example Products for different product types (e.g., POSTER_2x3, CANVAS_SQUARE, APPAREL). Switching “lanes” is as simple as picking the right blueprint.

Step 3: Define Product Info Rules (Titles, Descriptions, Tags)
This is where the AI and automation kick into high gear. Instead of writing repetitive copy, the system automatically generates SEO-rich product information for each artwork.
Titles – Use simple or compound title formats.
- Simple title: just the artwork’s subject (e.g., “Moonlit Mountain Lake”).
- Compound title: the simple root title + descriptive subtitle segments. Example:
Moonlit Mountain Lake: Tranquil Nature Artwork, Serene Blue Landscape — Poster Wall Art
Descriptions – AI generates unique prose covering subject, style, palette, and mood. Then you can append standardized HTML blocks (materials, sizes, care instructions, etc.) to keep consistency across your catalog.
Tags – Artwork-specific tags are automatically generated, and you can layer on your own broad, product-level tags like “poster,” “canvas print,” or “wall decor.” This keeps your catalog organized and helps maximize search visibility.

Step 4: Click “Create My Products”
This is the payoff moment. Hit the button, and the Bulk POD Product Creator:
- Places all images according to your rule.
- Clones your Example Product’s structure and pricing.
- Generates titles, descriptions, and tags.
- Publishes all products in one automated run.
Save this setup as a Saved Operation so next time it’s even faster: load preset → upload images → click go.
Result: What used to take hours (or days) is now condensed into minutes.

The Power of Stacking AI Image Generation + Automated Product Creation
Now here’s where things get truly explosive. Imagine combining:
- Bulk AI artwork generation (hundreds of prompts run through Midjourney or DALL·E).
- Bulk print-on-demand product creation (hundreds of those images converted into fully configured Etsy products automatically).
Together, these workflows create a growth flywheel for your Etsy shop. Instead of moving at a crawl—making 5 products a night—you’re dropping hundreds of products per week without burning yourself out.
- More products = more keyword coverage.
- More keyword coverage = more traffic.
- More traffic + bigger catalog = more sales, higher average order values, and compounding momentum.
This is how you go from being “just another Etsy seller” to running a monster-sized shop that scales fast. You’re no longer capped by time or manual effort—you’re operating on systems and automation, the same way every fast-scaling business in history has done it.